Debian13十分钟速装与初始化配置指南

概述

Debian 13(代号 Trixie)是 Debian 项目当前的最新稳定版。本文将记录一次从安装到初始化配置的过程,涵盖禁网后快速安装系统、网络配置、SSH 远程登录、APT 源修复以及常用工具安装,适合需要在十分钟内快速部署 Debian 13 服务器或虚拟机的场景。

一、禁网后快速安装

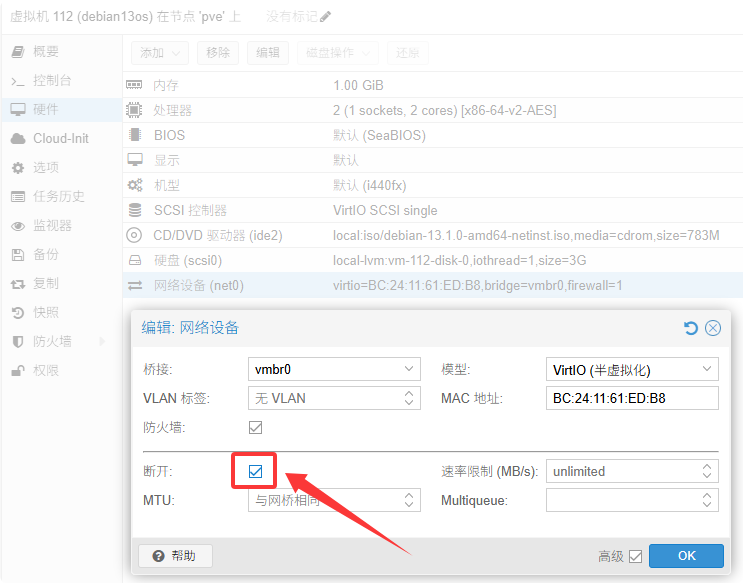
安装 Debian 13 时,建议在安装阶段断开网络连接。安装程序默认会从网络下载软件包和更新,断网安装可以跳过这些步骤,大幅缩短安装时间。安装过程中遇到“配置软件包管理器”或“网络镜像”等需要联网的步骤,直接选择跳过即可。安装过程如何选择,具体我就不多写了。下图是用PVE创建的虚拟机,禁用网络后再安装的图。

img

以下是安装过程选择简述

1、选择语言–》简体中文–》中国–》汉语
2、配置网络失败提示–》继续–》暂时不配置网络–》继续
3、主机名–》root密码–》新用户名–》新用户密码
4、磁盘分区–》向导 - 使用整个磁盘 –》这里我划分的硬盘很小,所以选择小磁盘(《10GB)分区方案
5、配置软件包管理器–》扫描额外安装介质(否)–》不使用网络镜像站点(否)–》参加软件包流行度调查(否),其它默认一路继续即可
6、安装GRUB启动引导器–》选择(是)–》选择 /dev/sda –》 一路继续即可完成安装并重启。

img

二、开网并配置 DHCP

安装完成重启后,先接通网络 或 将虚拟网络的断开的勾选去掉保存。

使用 ip a 命令查看网卡名称,通常为 ens18enp0s3 等。确认网卡名后,编辑网络配置文件:

ip a
nano /etc/network/interfaces

img

在文件末尾追加以下内容(将 ens18 替换为你实际的网卡名):

allow-hotplug ens18
iface ens18 inet dhcp

img

保存退出后,重启网络服务:

systemctl restart networking

稍等片刻,使用以下命令查看是否已获取到 IPv4 和 IPv6 地址(如果有IPv6):

ip a

img

可以看出这里给我们分配的IPv4地址是:192.168.2.34

三、安装 SSH 工具

安装 openssh-server

apt install openssh-server

img

允许 root 通过 SSH 登录

Debian 13 默认禁止 root 用户通过密码直接 SSH 登录。如需使用 root 远程登录,需要修改 SSH 配置文件:

nano /etc/ssh/sshd_config

找到 PermitRootLogin 这一行,将其修改为:

PermitRootLogin yes

如果该行被注释(前面有 #),去掉注释符后再修改。同时确认密码认证已开启:

PasswordAuthentication yes

保存退出后,重启 SSH 服务使配置生效:

systemctl restart ssh

重启后即可使用 root 账户通过 SSH 远程登录。

安全提示PermitRootLogin yes 允许 root 通过密码登录,安全性较低。建议仅在初始配置阶段使用,后续可改为 prohibit-password,仅允许密钥登录 root。

四、修复 APT 安装源

最小化安装的 Debian 13 可能缺少有效的 APT 源,或者默认源在国内访问速度较慢。下面提供三个国内镜像源方案,选择其一即可。

操作前备份

cp /etc/apt/sources.list /etc/apt/sources.list.bak

清空并编辑源文件

nano /etc/apt/sources.list

清空文件原有内容,从以下三个方案中选择一个粘贴进去。

方案一:阿里云源(推荐,覆盖广、速度快)

deb https://mirrors.aliyun.com/debian/ trixie main contrib non-free non-free-firmware
deb-src https://mirrors.aliyun.com/debian/ trixie main contrib non-free non-free-firmware
deb https://mirrors.aliyun.com/debian-security/ trixie-security main contrib non-free non-free-firmware
deb-src https://mirrors.aliyun.com/debian-security/ trixie-security main contrib non-free non-free-firmware
deb https://mirrors.aliyun.com/debian/ trixie-updates main contrib non-free non-free-firmware
deb-src https://mirrors.aliyun.com/debian/ trixie-updates main contrib non-free non-free-firmware
deb https://mirrors.aliyun.com/debian/ trixie-backports main contrib non-free non-free-firmware
deb-src https://mirrors.aliyun.com/debian/ trixie-backports main contrib non-free non-free-firmware

方案二:清华大学源(教育网优化,支持 IPv6)

deb https://mirrors.tuna.tsinghua.edu.cn/debian/ trixie main contrib non-free non-free-firmware
deb-src https://mirrors.tuna.tsinghua.edu.cn/debian/ trixie main contrib non-free non-free-firmware
deb https://mirrors.tuna.tsinghua.edu.cn/debian/ trixie-updates main contrib non-free non-free-firmware
deb-src https://mirrors.tuna.tsinghua.edu.cn/debian/ trixie-updates main contrib non-free non-free-firmware
deb https://mirrors.tuna.tsinghua.edu.cn/debian/ trixie-backports main contrib non-free non-free-firmware
deb-src https://mirrors.tuna.tsinghua.edu.cn/debian/ trixie-backports main contrib non-free non-free-firmware
deb https://mirrors.tuna.tsinghua.edu.cn/debian-security/ trixie-security main contrib non-free non-free-firmware
deb-src https://mirrors.tuna.tsinghua.edu.cn/debian-security/ trixie-security main contrib non-free non-free-firmware

方案三:中科大源(连接稳定,适合华中/华东地区)

deb https://mirrors.ustc.edu.cn/debian trixie main contrib non-free non-free-firmware
deb-src https://mirrors.ustc.edu.cn/debian trixie main contrib non-free non-free-firmware
deb https://mirrors.ustc.edu.cn/debian trixie-updates main contrib non-free non-free-firmware
deb-src https://mirrors.ustc.edu.cn/debian trixie-updates main contrib non-free non-free-firmware
deb https://mirrors.ustc.edu.cn/debian trixie-backports main contrib non-free non-free-firmware
deb-src https://mirrors.ustc.edu.cn/debian trixie-backports main contrib non-free non-free-firmware

注意:如果安装时使用了 CD-ROM 作为源,需要将 sources.list 中以 deb cdrom: 开头的行注释掉或删除。
更新源缓存并安装常用工具

apt update
apt install curl wget fastfetch -y

小结

至此,Debian 13 的基础配置已完成。主要步骤回顾:

  1. 禁网安装,以节省时间;
  2. 配置 DHCP 网络,获取 IP 地址;
  3. 安装 openssh-server 并允许 root 远程登录;
  4. 替换为国内 APT 源,安装常用工具。
root@debian13os:~# df -h
Filesystem Size Used Avail Use% Mounted on
udev 457M 0 457M 0% /dev
tmpfs 97M 488K 97M 1% /run
/dev/sda1 2.4G 966M 1.3G 43% /
tmpfs 484M 0 484M 0% /dev/shm
tmpfs 1.0M 0 1.0M 0% /run/credentials/systemd-journald.service
tmpfs 5.0M 0 5.0M 0% /run/lock
tmpfs 484M 0 484M 0% /tmp
tmpfs 1.0M 0 1.0M 0% /run/credentials/getty@tty1.service
tmpfs 97M 4.0K 97M 1% /run/user/0
root@debian13os:~# free -h
total used free shared buff/cache available
Mem: 967Mi 238Mi 485Mi 492Ki 378Mi 728Mi
Swap: 516Mi 0B 516Mi
root@debian13os:~# fastfetch
_,met$$$$$gg. root@debian13os
,g$$$$$$$$$$$$$$$P. ---------------
,g$$P"" """Y$$.". OS: Debian GNU/Linux 13 (trixie) x86_64
,$$P' `$$$. Host: KVM/QEMU Standard PC (i440FX + PIIX, 1996) (pc-i440fx-10.0)
',$$P ,ggs. `$$b: Kernel: Linux 6.12.43+deb13-amd64
`d$$' ,$P"' . $$$ Uptime: 22 mins
$$P d$' , $$P Packages: 276 (dpkg)
$$: $$. - ,d$$' Shell: bash 5.2.37
$$; Y$b._ _,d$P' Display (QEMU Monitor): 1280x800 @ 75 Hz in 15"
Y$$. `.`"Y$$$$P"' Terminal: /dev/pts/1
`$$b "-.__ CPU: QEMU Virtual version 2.5+ (2) @ 1.79 GHz
`Y$$b GPU: Unknown Device 1111 (VGA compatible)
`Y$$. Memory: 237.26 MiB / 967.08 MiB (25%)
`$$b. Swap: 0 B / 517.00 MiB (0%)
`Y$$b. Disk (/): 965.79 MiB / 2.38 GiB (40%) - ext4
`"Y$b._ Local IP (ens18): 192.168.2.34/24
`"""" Locale: C
root@debian13os:~#

至此我们已经初步完成Debian13系统的安装,可以正常使用了。正常人依据教程指南操作下来,预计十来分钟左右。当然后续也可根据需要进一步配置防火墙、sudo 权限、SSH 密钥认证等,提升系统的安全性和可用性,这里就不多说了。